
How to Convert a Wine Barrel into a Rain Barrel
Most people who have a yard, know how expensive water can be. This is true even in Western Washington where at least six months out of the year, we seem to have more than we need. For us, rain barrels provide both water storage and water control. In the Winter and Spring, the rain barrels provide a way for us to direct water away from our house and focus it on different areas of our property. In the Summer, we can use stored water to keep our plants growing and save on our water bill.
A quick pause here: before you undertake a project to install rain barrels on your property, check local regulations to make sure they are legal. Not all cities, counties or states allow the capture and storage of rain water.
When we purchased our home, there was one sad, lonely little rain barrel and we knew we would need to add more. This began the typical round of researching, googling options, comparing prices, materials and designs and finally deciding to temporarily use large plastic garbage cans we already had on hand. They were UGLY and not something I felt added any curb appeal. But they worked for a few seasons.
This past Winter, we were looking for a wine barrel to make a glass top game table for our living room. We found the perfect supplier on Craigslist. The price was so good at $75/barrel. Blank barrels for projects was more than we could resist. Instead of purchasing one barrel, Brian came home with four. I think he would have brought more on that first trip but his big, beasty, diesel truck wouldn’t hold any more.
Here are step-by-step instructions for converting a wine barrel into a beautiful AND functional rain barrel. Disclaimer here- I had every intention of providing a video but it appears my learning curve is higher than I anticipated. I do have some great pictures though, so we’ll just make those work!
The supplies you’ll need are:
- A Wine Barrel- obviously 😊
- Pond Liner – enough to cover the top of the barrel
- Metal Screen Material- we used quarter inch, but you could use any heavy-duty screen, the purpose is to keep leaves, twigs and mosquitoes out of your barrel (especially the mosquitoes!)
- Silicone sealant
- Silicone Bung (Solid) – Carboy
- staples
- 2 spigots- we purchased ¾ quarter inch inexpensive metal ones with flanges on them
- Nipples – these screw into the spigot and are in the same area at the hardware store. This is what you push into the holes you drill.
- Screws- these attach the spigot to the barrel, just make sure they’re long enough and galvanized so they don’t rust
- Optional- cinder blocks to form a base to place your barrel on
- Optional- 0.5 cubic ft bag of river rock or some other decorative rock big enough to not fall through the screen. We do this because our screen is bigger, and we needed something to keep the mosquitoes out and it’s pretty.
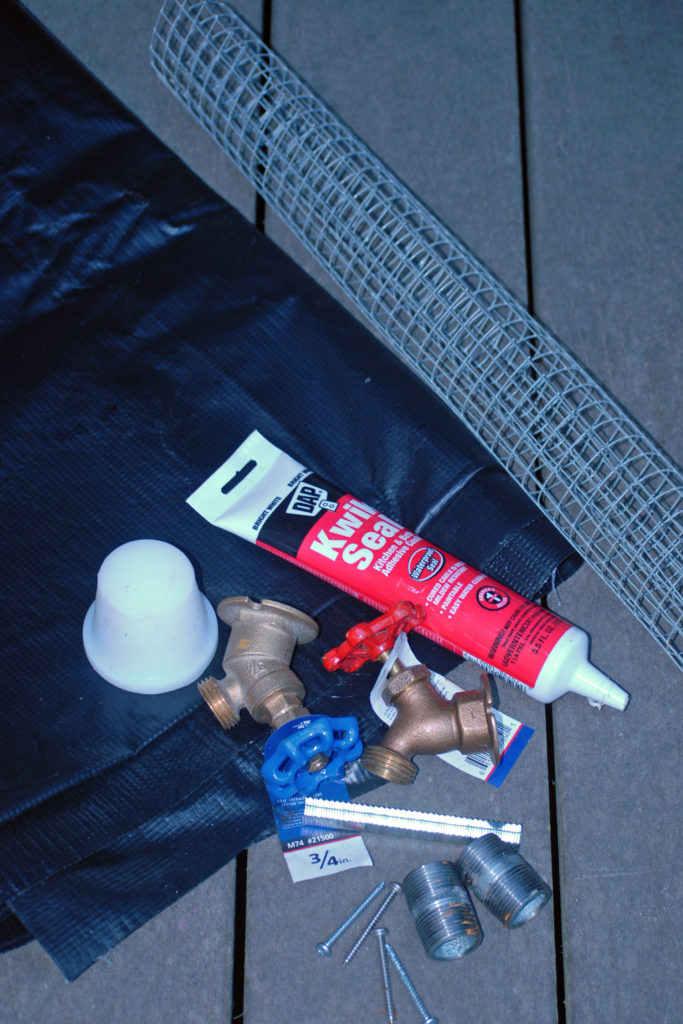
Supplies for the Rain Barrel
Tools needed:
- Sawzall, or Jig Saw: we make our opening round, but you can make your opening whatever shape you want
- Drill and a drill bit large enough to make holes for the spigots- we used a 1-inch drill bit
- Wrench for inserting the spigots
- Staple gun
- A template for the opening in the top
- Something to cut the pond liner. We used a box knife, but any sharp knife or scissors should work.
- Wire cutters for the screening
- A pencil to mark where you want to put holes
- Flashlight
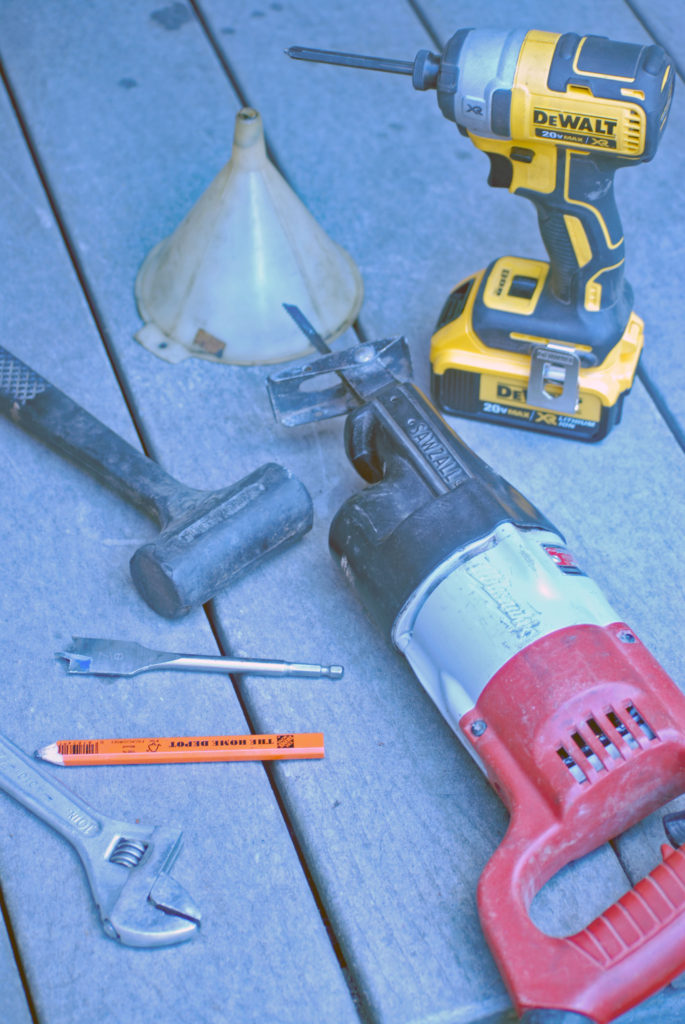
Tools needed
Ok, so after you have everything gathered it’s, time to get started.
The rain barrel ends up with 3 openings. The top one is where rain water is collected from your gutters. The other 2 are in the form of the spigots. One of the spigots should be positioned near the bottom of the barrel. The other one is near the top. When it is raining, and you are filling up the barrel, you connect a hose to the TOP spigot and leave the spigot in the open position. This allows the barrel to fill up but not overflow. When you’d like to use the water, move the hose to the bottom spigot and allow gravity to help with the water pressure.
We position the spigots on the same board and avoid the tap hole. This is personal preference and depending on your needs, it may make sense to have the spigots in different areas. Whatever you decide, just make sure you have a spigot near the bottom and a spigot near the top. Mark where you decide to put your spigots with the pencil. On the top of the barrel, mark the shape and location you’d like your collection hole. Again, for us, it made sense to have the hole towards one side and away from the spigots. Now, you’re ready to drill. Oak is a hard wood and these barrels are thick. Be prepared to apply pressure to your drill and have the battery is charged. Drill all your holes at the same time. You’ll need a hole drilled in the top for the blade of your saw to start in.
Next, using the jigsaw or Sawzall, cut out the template you drew on the top of the barrel. It’s ok if the cutout falls into the barrel, you’ll be retrieving it along with other wood. Here is a fun fact, wine barrels have extra oak slats in them. This increases the amount of wine in contact with the wood as it ages. Until we cut open our first wine barrel, this is something that had never occurred to me! We consider these slats of wood as a bonus. They smell amazing. We have saved all them and plan to use them for projects in the future. We have a friend who is using his to make picture frames. Use the flashlight to retrieve all the wood from inside the barrel. Tipping it on it’s side may be necessary here.
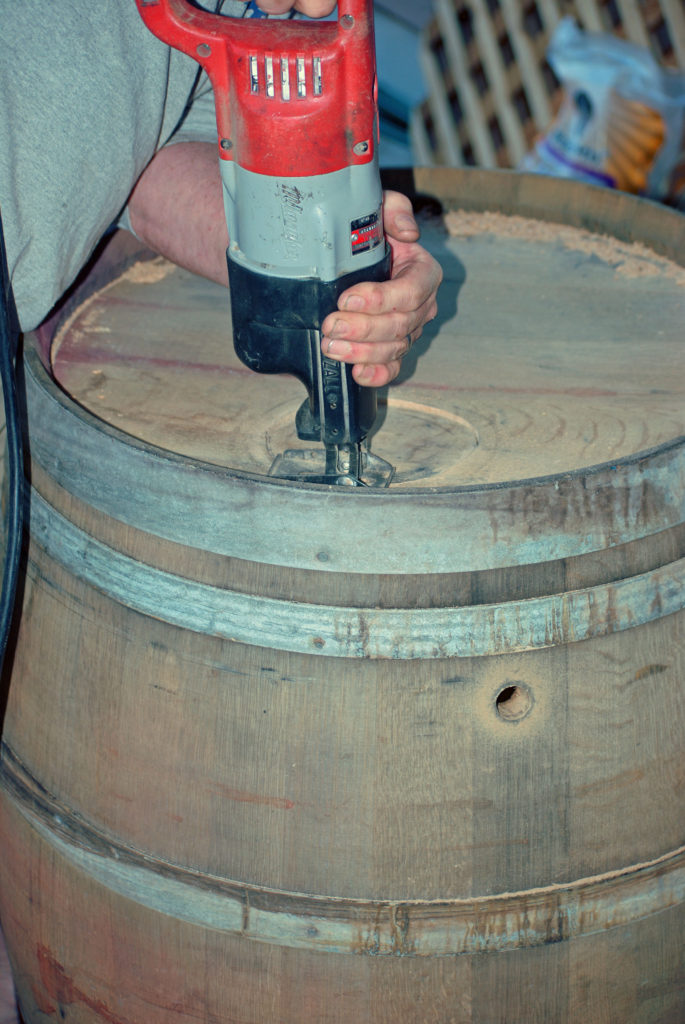
Drilled holes and cutting the top.
Put the pond liner on top of the barrel. Cut the size you need to go up the sides of the barrel top. The wood of your rain barrel will last longer if you protect it from water resting on the top. If your brain works like Brian’s, you’ll staple the pond liner first and then cut it. I prefer to cut it and then staple. Either way works. Now you can cut an X across the hole in the top of the barrel. Fold the pond liner into the hole and staple around the edges. Now you’re ready to staple the screen down over the hole. Please wear leather gloves when you do this to protect your hands. The wire can be sharp and tends to bite. At this point you’re finished with the top until you move the barrel into place.
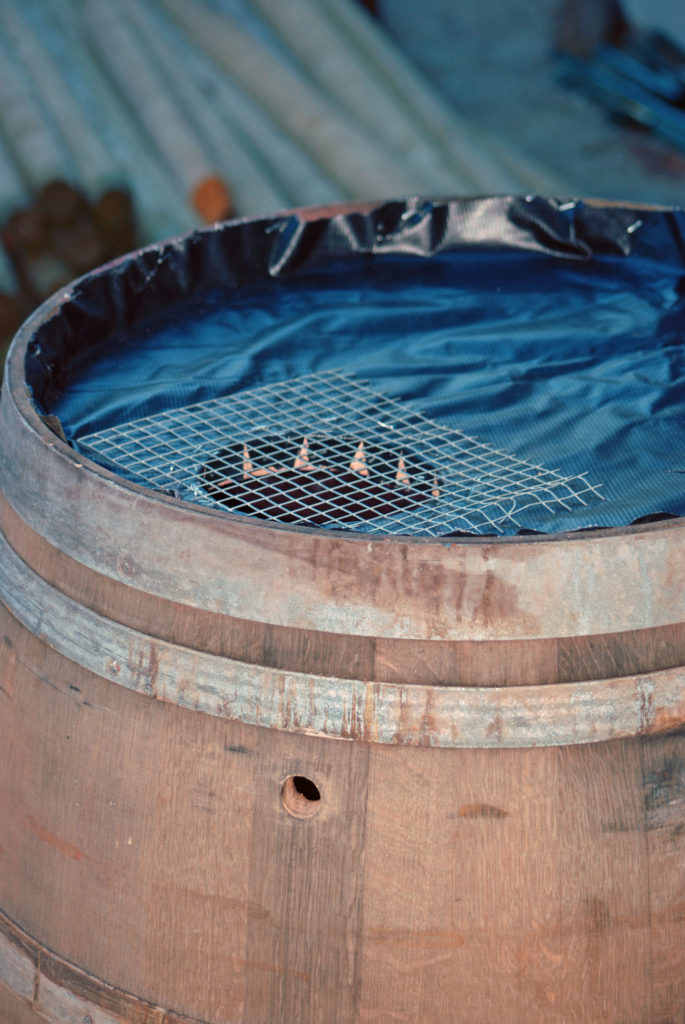
Pond Liner and screen installed on the top.
Inserting the spigots takes some elbow grease. We smeared silicon on the nipple to lubricate it and make it easier to insert. Use the wrench to twist it into place. Remember the saying, “Righty tighty, Lefty loosy”. Before the last turn put a “bead’ of silicon under the flange of the spigot to create a seal. After you have the spigot in snuggly, place two screws into the flange to secure it. Repeat this with the other spigot. We, meaning Brian, have made four of these rain barrels. From an old back talking, do the bottom spigot first so you can be in a more upright position when you’re more tired.
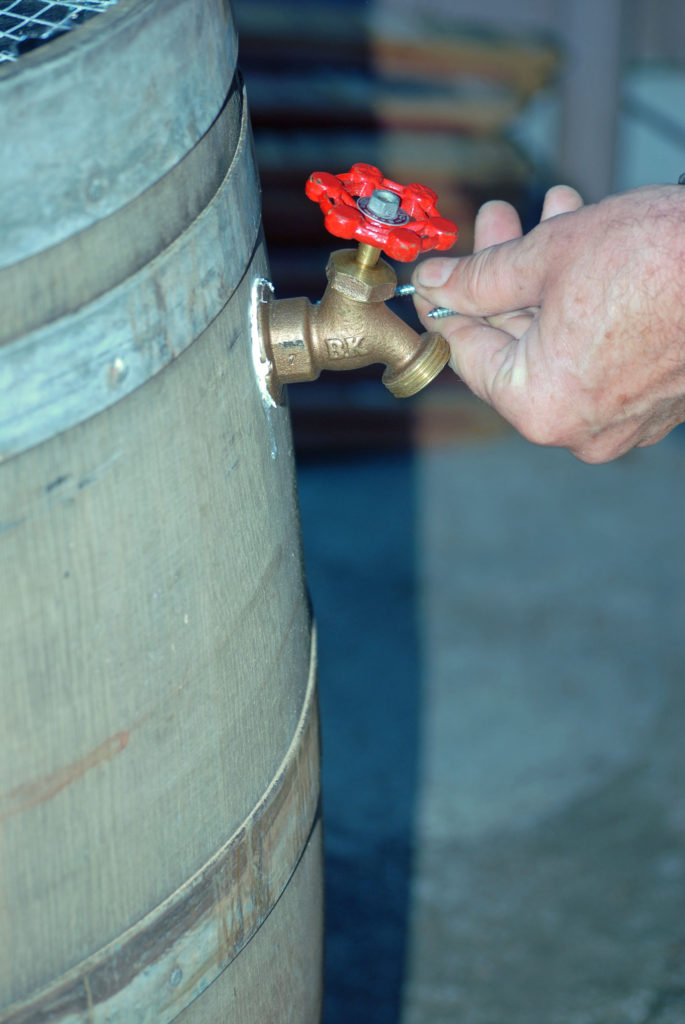
Top Spigot sealed and being secured
You still need to insert the Bung Plug. This can be a white silicon plug or if you want to be fancy you can use a wood plug or cork. The cost difference is around $10, so we use the silicon plug. The plug can be difficult to pound in so silicon smeared on it might help. You could also use a hammer to tap it in.
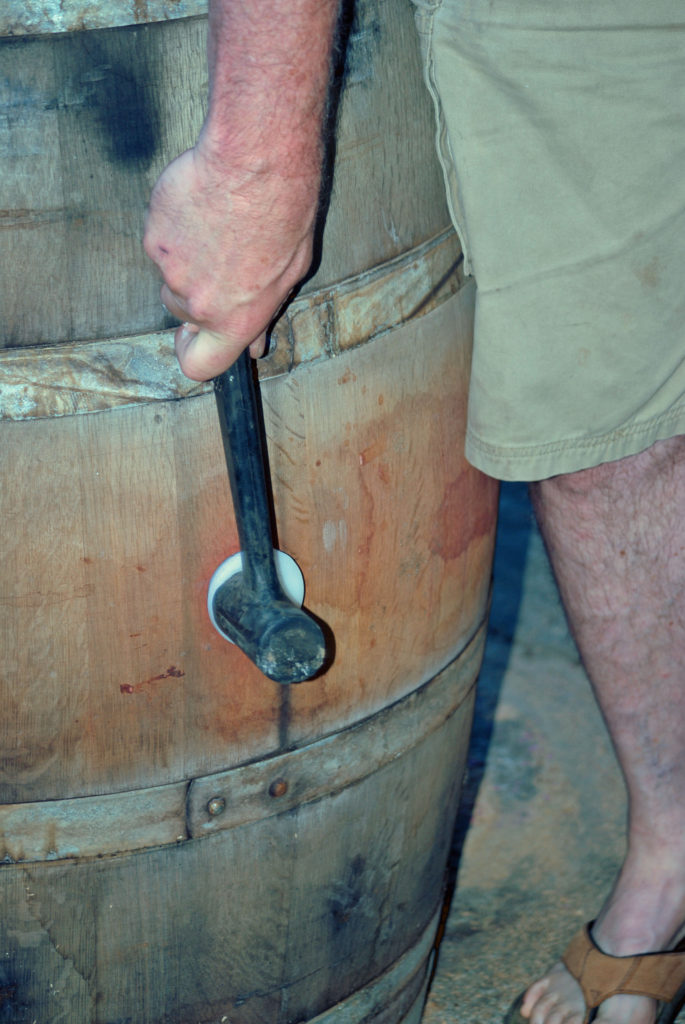
Bung Plug going in
Ok, so now, you’re ready to move your beautiful rain barrel into position under your rain gutter. We place ours on cinder blocks to keep it off the dirt, raise it a little to help with water pressure and make it easier to level. To Prep your site, use a shovel to level the area. If you aren’t going to use cinder blocks, we do recommend a gravel base with weed paper under it or at least weed paper.
Maneuver your barrel into place and position your gutter down spout over the top hole. If you decided to use decorative rock or river rock, pour them on now.
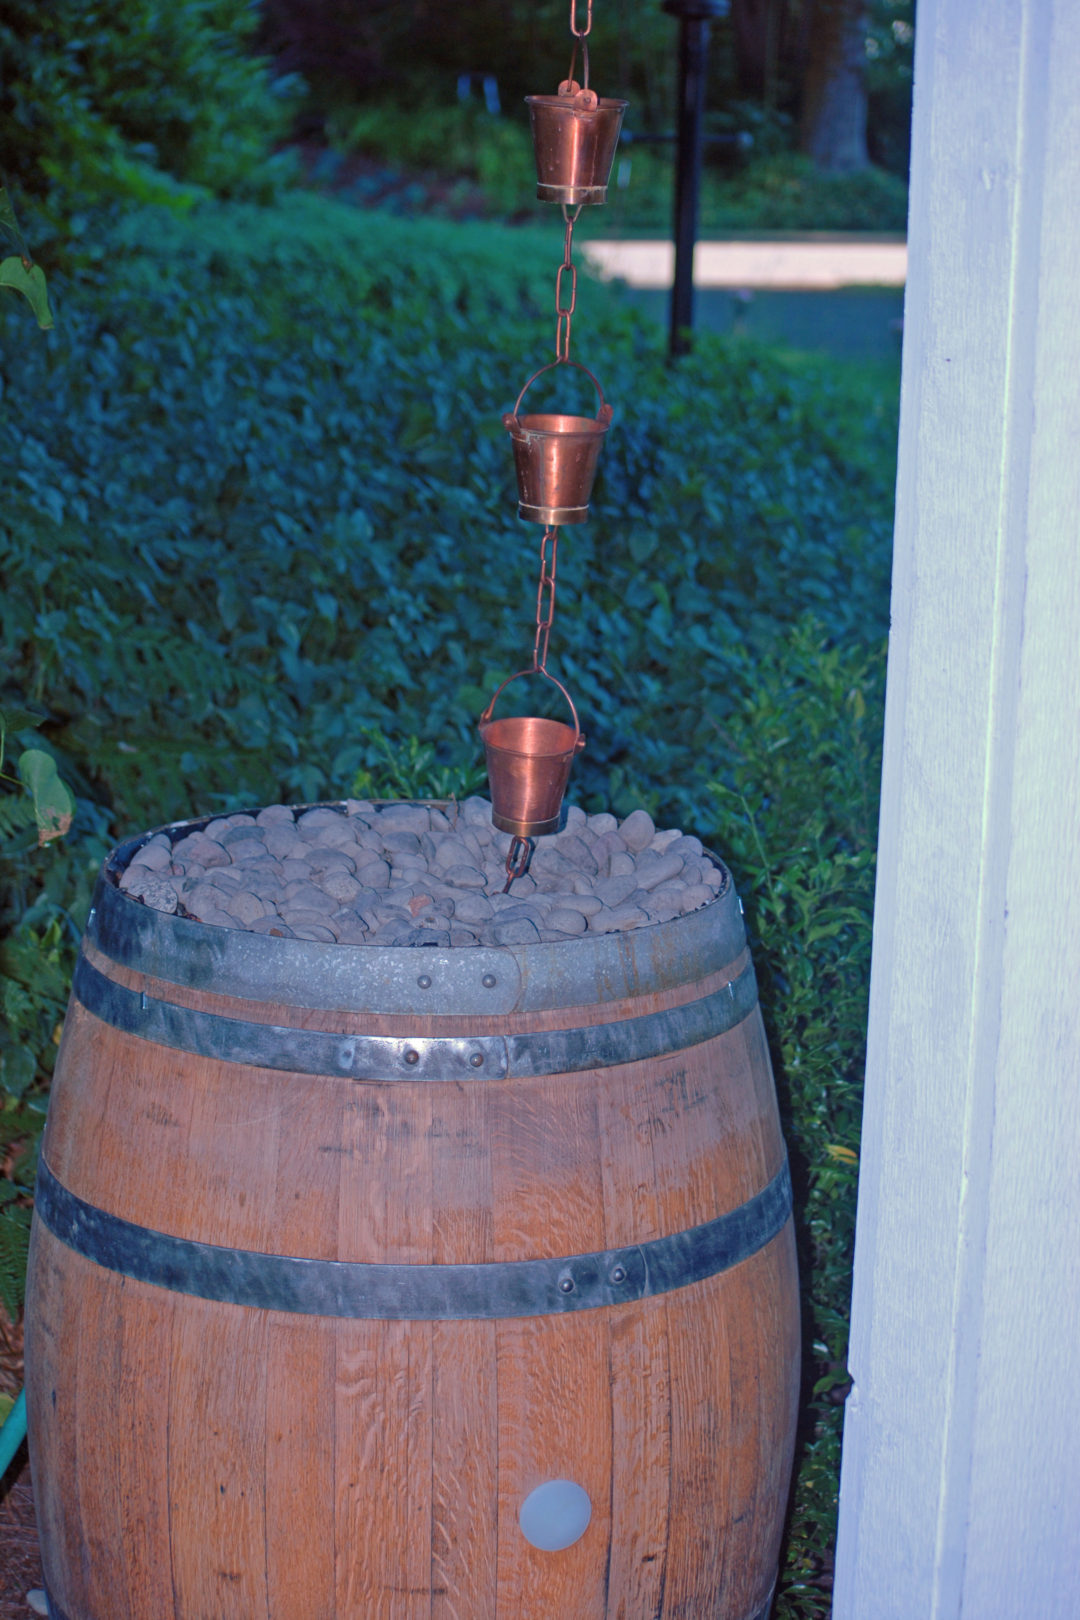
This project takes about 45 minutes to complete. We love the natural oak color of wine barrels but don’t be afraid to paint or stain yours. I also purchased a copper rain chain for the front of our house. It was long enough for us to use one chain on 2 corners.

Finished Rain Barrel
Total cost for each barrel was around $90. This works out to be slightly less than a plastic, pre-made rain barrel. On our journey, we feel this is a great option. We saved money, didn’t use plastic, repurposed, and met a very nice man.
Wine barrels range in price quite a bit. Look on Craigslist and other local sale sites. We have helped a few people at our church obtain barrels from the Wine Barrel Guy. We have at least 2 more trips out to his home to pick up more barrels.
Do you have rain barrels? Have you ever considered making your property more “rain-wise”? How do you conserve water for your garden and lawn?


30 Comments
Very pretty and creative. We bought our rain barrel at the end of the season, so it was inexpensive, but not nearly as pretty as yours!
HEHEHE, I don’t think we have an END of the season here. Good for you to plan ahead and get a great deal. That’s the best way to purchase anything!
Love this idea. Going to have to drink a keg of wine. Looks so rustic and rich. Great how to detail.
This is the best DIY rain barrel I have ever seen! Pretty and blend well with the nature, unlike my garbage bin rain barrel, hehe
This is so much more attractive than a plastic rain barrel!
Yes, the plastic rain barrels come in different shapes and sizes so there is a benefit to them in some situations.
It looks lovely! Adds a real special charm to the yard as well.
Only 45 mins!? Looks great!
Yes, this is actually a very quick project! Installing it may take longer if you need to remove part of your gutter. Having the right tools also helps it go a little faster.
I’m going to show this to my husband. What a great project! Thanks for all the tips an tricks.
Don’t hesitate to email us if you have any questions.
This is a wonderful idea! I can imagine how great it is on the water bill as well!
SOOOOOOOOOO cool! 🙂
This is such an awesome idea! We lived in Central California wine country for several years and wanted to decorate our whole house with all things wine barrel related. I wonder if I’d be able to track some down in Massachusetts??!
I’ve wanted a rain barrel at our home for a long time. Now we’re selling the house and traveling. Guess I’ll have to try again in the future. =)
What a cute idea! Most rain barrels are ugly and therefore don’t get approved by my homeowner’s association. Thank you for the step by step directions.
Oh wow- great information. 🙂
Fabulous idea!! Very creative and what a great way to conserve water for the garden and lawn.
Such a cool idea! And pretty, too. I didn’t even know people did things with wine barrels! I don’t see them a lot around here.
What an interesting concept! I think your pictures turned out great.
What a great idea! Looks like it turned out great!
Wow, neat idea!
This is super cool! I wouldn’t have ever thought of this! It turned out amazing!
Why put the faucet at the top of the barrel?
If you want to use the water doesn’t it make more sense to put the faucet near the bottom?
Hi there, sorry for the late response. I haven’t been as active on my blog as I would like and am just getting back in to get it revived.
The reason for the upper spigot is to act as an overflow valve in periods of heavy rain. You can also use the upper spigot to connect more than one barrel together by running a hose from one to the other.
I hope this answers your question. Have a great day!
I have my barrel already and stumbled on your instructions. What a great help they will be with my project. Just wondered whether you have to deal with extensive freezing periods and if so what you do with your barrel in the winter-time. I’m in Ottawa, Canada, so it will be freezing for 4 months or so.
I’m a little confused. Why did you drill a one inch hole for a 3/4 inch spigot and nipple and why in the picture of tools is the drill bit7/8 inch? How do you keep the nipple from falling out of the hole? Would it help to put a washer and nut on the inside? Thank you!
I like the idea of using used wood barrels instead of the ugly blue ones. Any thoughts on linking them together for more capacity? Maybe some copper pipe to show it off instead of garden hose? I like you went in the top instead of the side like the other instructable I saw.
I really like how descriptive your tutorial is! My father purchased an old wine barrel and converted it to a rain barrel for my first house, and 20 years later I have just purchased a wine barrel for my current house. This set of instructions seems really clear and I will be following it when I convert mine! Thank you so much!
Where does the overflow water go?